
 Window sills play a significant role in both the aesthetic and functional elements of a home. While they may seem like a subtle architectural detail, window sills are crucial in protecting your walls from water damage, enhancing the overall look of your space, and guiding efficient installation processes. Whether you’re a DIY enthusiast or a home improvement professional, this guide will provide an in-depth overview of window sill materials, installation methods, and maintenance tips to keep them in top shape.
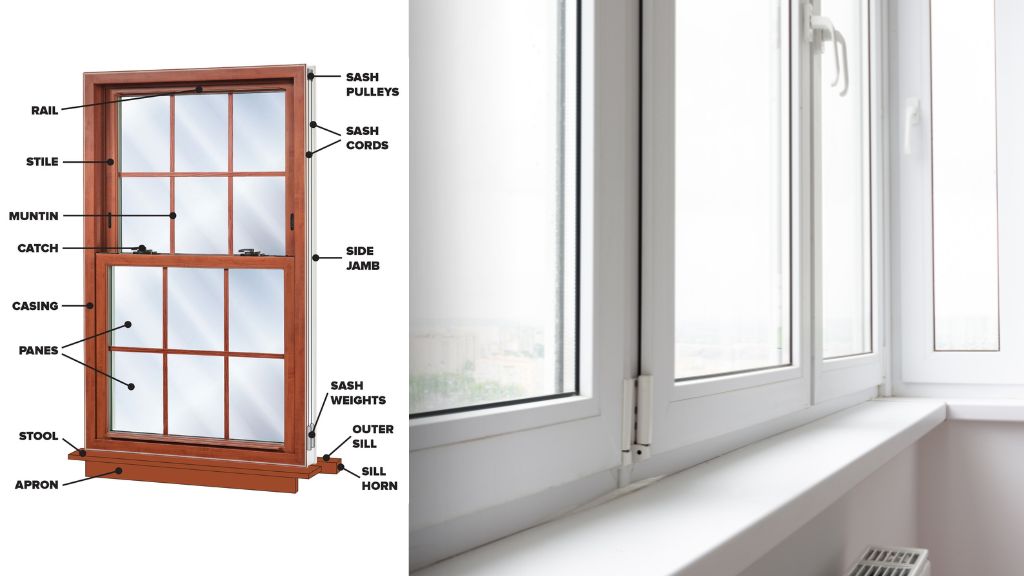
What Are Window Sills and Why Are They Important?
A window sill is the horizontal component at the bottom part of the window frame. It provides structural stability, supports the window, and acts as a barrier against water, preventing it from seeping into your home. Beyond their functionality, window sills also serve as a design element, offering opportunities to add a personal touch to your windows by selecting unique materials or finishes.
Key Functions of Window Sills:
- Water Protection: Redirects water away from the wall to prevent leaks and damage.
- Structural Support: Offers a stable base for the installation of the window frame.
- Insulation: Reduces drafts, ensuring better energy efficiency.
- Aesthetic Appeal: Enhances the appearance of both the interior and exterior of your home.
Now that we understand why window sills are essential, let’s explore the most popular materials and their unique properties.
Materials for Window Sills
Choosing the right material is crucial for both durability and design. Here’s a breakdown of the most commonly used window sill materials:
- Wood
Wood is a classic choice that adds warmth and a traditional feel to any window. However, it requires regular maintenance to prevent rot, especially in areas with high humidity.
- Pros: Versatile, easy to paint or stain, classic aesthetic.
- Cons: Prone to decay, requires sealing and maintenance.
- Best For: Homes with vintage or rustic design elements.
- Vinyl
Vinyl window sills are practical and low-maintenance, making them one of the most popular options for modern homes. They’re resistant to water and can last for years without showing signs of damage.
- Pros: Cost-effective, durable, water-resistant.
- Cons: Limited design flexibility.
- Best For: Contemporary or minimalist decor styles.
- Stone
Natural stone window sills, such as granite or marble, bring an upscale, luxurious touch to interiors. They’re highly durable and require minimal maintenance.
- Pros: Extremely durable, visually stunning.
- Cons: Expensive, heavy, requires professional installation.
- Best For: High-end properties or areas with a premium design focus.
- Metal
Metal window sills, usually made from aluminum, are lightweight and resistant to rust when properly coated. They’re a good option for industrial or modern-style homes and offices.
- Pros: Sleek appearance, rust and corrosion resistance.
- Cons: Can dent or scratch easily.
- Best For: Industrial or modern home aesthetics.
- PVC Composite
PVC composites are gaining popularity due to their affordability, resilience, and variety of styles. They can mimic wood and other materials while being more resistant to moisture.
- Pros: Water-resistant, mimics other materials, easy to maintain.
- Cons: Less eco-friendly compared to natural materials.
- Best For: Budget-conscious homeowners seeking durability.
How to Install a Window Sill
Installing a window sill involves some basic carpentry skills and the right tools. Follow these simple steps for a DIY installation:
Step 1: Measure and Cut
Measure the width and depth of the window opening to ensure a snug fit. Use a saw to cut the material of your choice to the proper dimensions.
Step 2: Prepare the Surface
Remove any debris or old caulking from the window frame. Make sure the area is clean and level to provide a stable base for the sill.
Step 3: Position the Sill
Place the sill securely in the frame. Ensure it’s flush with the edges and doesn’t tilt or wobble.
Step 4: Secure the Sill
Use screws, nails, or appropriate adhesives to fasten the sill in place. For stone or metal sills, professional-grade sealants may be necessary.
Step 5: Seal and Finish
Apply waterproof caulking around the edges to ensure no water leaks into your home. Sand, paint, or finish the sill as needed based on your material choice.
Installing a window sill correctly will protect your home and save you from costly repairs in the future.
Tips for Window Sill Maintenance
Window sills are exposed to the elements, making regular maintenance essential. Here’s how you can extend their life:
- Clean Regularly
Dust and dirt can accumulate on your sill over time. Wipe it down with a damp cloth and mild soap to keep it clean.
- Inspect for Damage
Check for cracks, warping, or signs of water infiltration. Early detection can prevent bigger problems down the line.
- Repaint or Seal
For materials like wood, seal or repaint your sills every few years to maintain their durability and appearance.
- Monitor Moisture Levels
Ensure that water isn’t pooling on or around your sill. If you notice water damage, reseal or replace the sill promptly.
- Protect Against Sunlight
Prolonged sunlight exposure can cause fading or warping. Consider installing shades, curtains, or UV-protective films to minimize this risk.
Proper maintenance ensures that your window sills remain functional and visually appealing for years.
Final Thoughts on Window Sills
Window sills may seem like a small part of your home, but their importance cannot be overstated. From choosing the right materials to proper installation and maintenance, every step contributes to their longevity, functionality, and aesthetic appeal. By following this guide, you can ensure that your window sills not only enhance your home’s beauty but also provide the protection and support your windows need.